Methods to Change Network Type in Windows 10
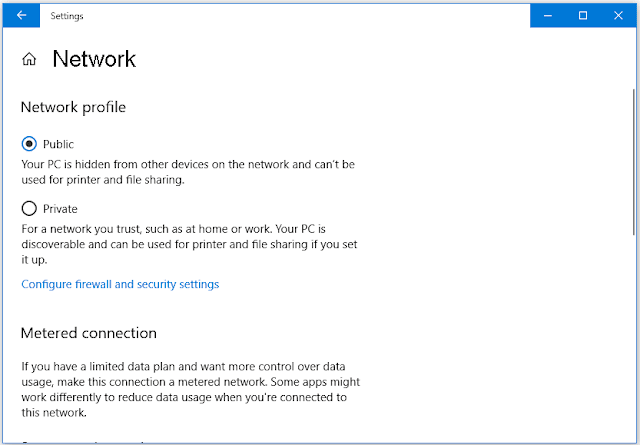
You can configure network profile as Public or Private when you connect to a new network the first time. When you set a network location, it not only identifies the type of the network that your computer is connected, but also automatically sets the appropriate firewall settings for that location.
If you set the network type as Public, then your computer is invisible to other devices connected the same network. When you are out in airport or other public areas, you can set network profile as Public for safety sake.
However, if you are at home or in the office, you can set the network type as Private. By doing so, your computer is visible to other devices connected to the same network. You can use the file and printer sharing feature and communicate with those devices.
Here comes to the issue, how to change the network type in Windows 10 from Public to Private or vice versa when needed? You can check the 4 ways below.
Method 1. CHange Network Type Windows 10 from Network Settings
Generally you can find Network Profile option from Windows network settings so as to change network from Public to Private or in reverse in Windows 10. Check the detailed steps below.
Step 1. You can click Start -> Settings -> Network & Internet to open network settings window.
Step 2. Tap Ethernet, WiFi or VPN from the left pane to check your connected network. Make sure the network which you want to change network type is connected. If your Windows 10 computer can’t connect to Internet, you can try some measures to troubleshoot Internet connection problems.
Step 3. For Ethernet or WiFi network, you can double-click the connected network to open the Network Profile window to change network profile to Public or Private. For VPN connections, you can click the connected VPN, and click Advanced options button to open Network Profile window to change network type in Windows 10.
However, some of you may encounter Windows 10 Network Profile missing error on your computer, and can’t find the Network Profile option in Network settings window. Therefore, you can use the 3 alternative methods below to change the network category.
Method 2. Change Network Profile Windows 10 with PowerShell
Another easy way to make a network Public or Private is to use Windows PowerShell. Learn how to do it.
Step 1. At first, you need to open Windows PowerShell utility. You can press Windows + X key at the same time, and choose Windows PowerShell (Admin) to open it.
Step 2. Type the command lines below to set network type as Public or Private. Hit Enter key after typing each command.
Get-NetConnectionProfile
This command will display the detailed information of your connected network in PowerShell window, incl. network name, interface index number, network category, IPv4/IPv6 connectivity, etc. And Type this command line to change network type in Windows 10.
Set-NetConnectionProfile -InterfaceIndex <index number> -NetworkCategory Private
Method 3. Change Network Type Windows 10 with Local Security Policy
The second alternative way to change network location is to use Windows Local Security Policy.
Step 1. Press Windows + R key simultaneously to open Windows Run dialog. Type secpol.msc and click OK to quickly access Local Security Policy window.
Step 2. Next you can click Network List Manager Policies under Security Settings. You can see all networks are displayed at the right window.
Step 3. Then you can double-click your connected network to open its Properties window. Type Network Location tab and change the network location as Private, Public or Not configured under Location type.
Method 4. Change Network Type Windows 10 via Windows Registry Editor
The last way you can use to change network profile in Windows 10 is through Registry Editor.
Step 1. Similarly, you need to open Run window at first. Just press Windows + R to open it. Type regedit in Run box and hit Enter to open Registry window.
Step 2. In Registry Editor window, you can click HKEY_LOCAL_MACHINE > SOFTWARE > Microsoft > Windows NT > CurrentVersion > NetworkList > Profiles.
Step 3. Under Profiles, you can click the folders one by one to find the ProfileName key which matches your network name. Then you can double-click Category key to change the Value data from 0 to 1 or from 1 to 0 to change network type to Public or Private in Windows 10.
Conclusion
With these four methods, you can easily change the network type on your Windows 10 computer when you want to.


Post a Comment for "Methods to Change Network Type in Windows 10"